VBA in Excel: What is Visual Basic for Applications, How to Use
VBA in Excel: What is Visual Basic for Applications, How to Use

Everybody in this country should learn how to program a computer... because it teaches you how to think." -Steve JobsI wish to extend the wise words of Steve Jobs and say everyone in the world should learn how to program a computer. You may not necessarily end up working as a programmer or writing programs at all but it will teach you how to think.
In this VBA tutorial, we are going to cover the following topics.
- What is Visual Basic for Applications (VBA)?
- Why VBA?
- Personal & Business Applications of VBA in Excel
- Introduction to Visual Basic for Applications
- Step by step example of creating a simple EMI calculator in Excel
- How to use VBA in Excel Example
What is Visual Basic for Applications (VBA)?
Visual Basic for Applications (VBA) is an event-driven programming language implemented by Microsoft to develop Office applications. VBA helps to develop automation processes, Windows API, and user-defined functions. It also enables you to manipulate the user interface features of the host applications.
The process of telling the computer what you want it to do for you is what is known as computer programming. Just as you used English to tell the maid what to do, you can also use English like statements to tell the computer what to do. The English like statements fall in the category of high-level languages. VBA is a high-level language that you can use to bend excel to your all-powerful will.
VBA is actually a subset of Visual Basic 6.0 BASIC stands for Beginners All-Purpose Symbolic Instruction Code.
Why VBA?
VBA enables you to use English like statements to write instructions for creating various applications. VBA is easy to learn, and it has easy to use User Interface in which you just have to drag and drop the interface controls. It also allows you to enhance Excel functionality by making it behave the way you want.
Personal & Business Applications of VBA in Excel
For personal use, you can use it for simple macros that will automate most of your routine tasks. Read the article on Macros for more information on how you can achieve this.
For business use, you can create complete powerful programs powered by excel and VBA. The advantage of this approach is you can leverage the powerful features of excel in your own custom programs.
Introduction to Visual Basic for Applications
Before we can write any code, we need to know the basics first. The following basics will help you get started.
- Variable – in high school we learnt about algebra. Find (x + 2y) where x = 1 and y = 3. In this expression, x and y are variables. They can be assigned any numbers i.e. 1 and 3 respective as in this example. They can also be changed to say 4 and 2 respectively. Variables in short are memory locations. As you work with VBA Excel, you will be required to declare variables too just like in algebra classes
- Rules for creating variables
- Don’t use reserved words – if you work as a student, you cannot use the title lecturer or principal. These titles are reserved for the lecturers and the school authority. Reserved words are those words that have special meaning in Excel VBA and as such, you cannot use them as variable names.
- Variable names cannot contain spaces – you cannot define a variable named first number. You can use firstNumber or first_number.
- Use descriptive names – it’s very tempting to name a variable after yourself but avoid this. Use descriptive names i.e. quantity, price, subtotal etc. this will make your Excel VBA code easy to read
- Arithmetic operators – The rules of Brackets of Division Multiplication Addition and Subtraction (BODMAS) apply so remember to apply them when working with expressions that use multiple different arithmetic operators. Just like in excel, you can use
- + for addition
- – for subtraction
- * for multiplication
- / for division.
- Logical operators – The concept of logical operators covered in the earlier tutorials also apply when working with VBA. These include
- If statements
- OR
- NOT
- AND
- TRUE
- FALSE
How to Enable the Developer Tab
Below is the step-by-step process on how to enable the developer tab in Excel:
- Create a new workbook
- Click on the ribbon start button
- Select options
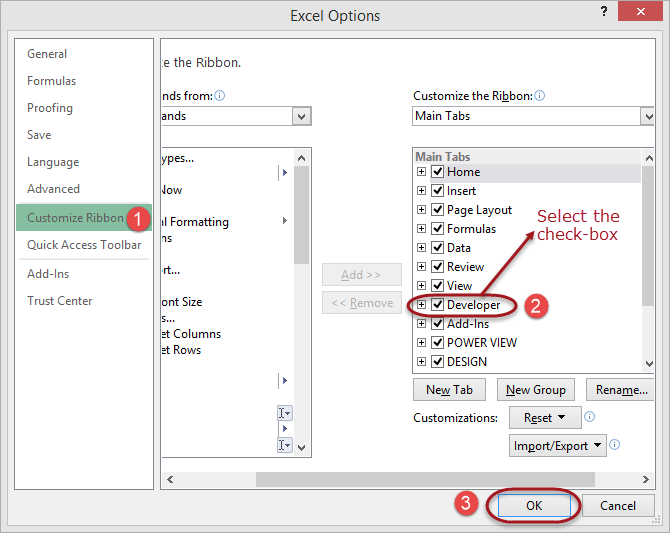
- Click on customize ribbon
- Select the developer checkbox as shown in the image below
- Click OK

You will now be able to see the DEVELOPER tab in the ribbon
VBA Hello World!
Now we will demonstrate how to program in VBA programming language. All program in VBA has to start with “Sub” and end with “End sub”. Here the name is the name you want to assign to your program. While sub stands for a subroutine which we will learn in the later part of the tutorial.
Sub name()
.
.
.
End Sub
We will create a basic VBA program that displays an input box to ask for the user’s name then display a greeting message
This tutorial assumes you have completed the tutorial on Macros in excel and have enabled the DEVELOPER tab in excel.
- Create a new workbook
- Save it in an excel macro enabled worksheet format *.xlsm
- Click on the DEVELOPER tab
- Click on INSERT drop down box under controls ribbon bar
- Select a command button as shown in the image below

Draw the command button anywhere on the worksheet
You will get the following dialogue window

- Rename the macro name to btnHelloWorld_Click
- Click on new button
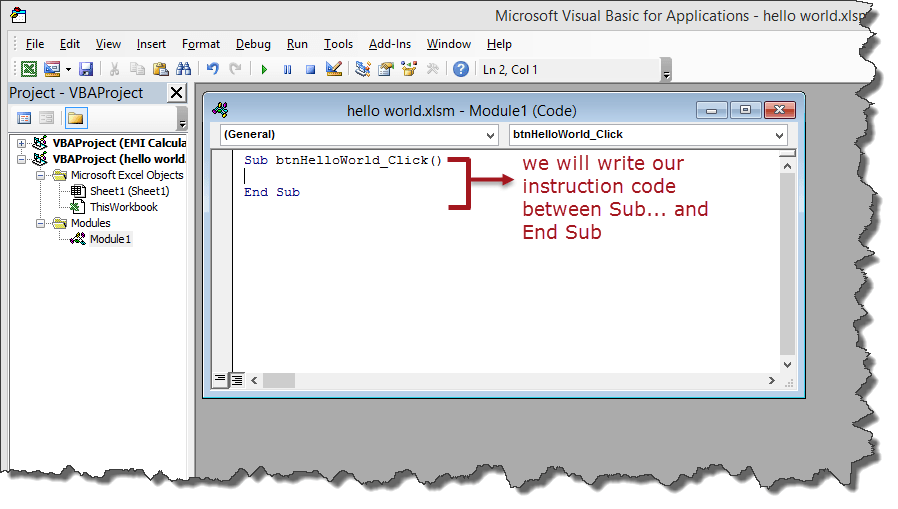
- You will get the following VBA code window

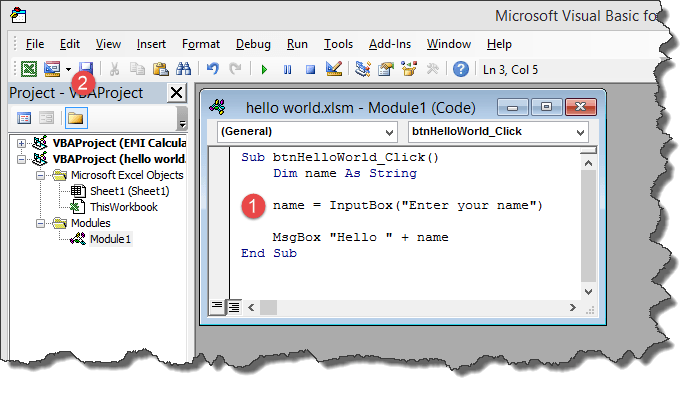
Enter the following instruction codes
Dim name As String
name = InputBox("Enter your name")
MsgBox "Hello " + name
HERE,
- “Dim name as String” creates a variable called name. The variable will accept text, numeric and other characters because we defined it as a string
- “name = Input Box (“Enter your name”)” calls the built in function Input Box that displays a window with the caption Enter your name. The entered name is then stored in the name variable.
- “Msg Box “Hello ” + name” calls the built-in function Msg Box that display Hello and the entered name.
Your complete code window should now look as follows

- Close the code window
- Right click on button 1 and select edit text
- Enter Say hello

- Click on Say Hello
- You will get the following input box

- Enter your name i.e., Jordan
- You will get the following message box

Congratulations, you just created your first VBA program in excel
Step by step example of creating a simple EMI calculator in Excel
In this tutorial exercise, we are going to create a simple program that calculates the EMI. EMI is the acronym for Equated Monthly Instalment. It’s the monthly amount that you repay when you get a loan. The following image shows the formula for calculating EMI.

The above formula is complex and can be written in excel. The good news is excel already took care of the above problem. You can use the PMT function to compute the above.
The PMT function works as follows
=PMT(rate,nper,pv)HERE,
- “rate” this is the monthly rate. It’s the interest rate divided by the number of payments per year
- “neper” it is the total number of payments. It’s the loan term multiplied by number of payments per year
- “pv” present value. It’s the actual loan amount
Create the GUI using excel cells as shown below

Add a command button between rows 7 and 8
Give the button macro name btn Calculate EMI_Click
Click on edit button
Enter the following code
Dim monthly_rate As Single, loan_amount As Double, number_of_periods As Single, emi As Double
monthly_rate = Range("B6").Value / Range("B5").Value
loan_amount = Range("B3").Value
number_of_periods = Range("B4").Value * Range("B5").Value
emi = WorksheetFunction.Pmt(monthly_rate, number_of_periods, -loan_amount)
Range("B9").Value = emi
HERE,
- “Dim monthly rate As Single,” Dim is the keyword that is used to define variables in VBA, monthly rate is the variable name, Single is the data type that means the variable will accept number.
- “Monthly rate = Range(“B6”). Value / Range(“B5″). Value” Range is the function used to access excel cells from VBA, Range(“B6”). Value makes reference to the value in B6
- “Worksheet Function. PMT(…)” Worksheet Function is the function used to access all the functions in excel
The following image shows the complete source code

- Click on save and close the code window
- Test your program as shown in the animated image below

How to use VBA in Excel Example
Following steps will explain how to use VBA in Excel.
Step 1) Open your VBA editor
Under Developer tab from the main menu, click on “Visual Basic” icon it will open your VBA editor.

Step 2) Select the Excel sheet & Double click on the worksheet
It will open a VBA editor, from where you can select the Excel sheet where you want to run the code. To open VBA editor double click on the worksheet.

It will open a VBA editor on the right-hand side of the folder. It will appear like a white space.

Step 3) Write anything you want to display in the Msg Box
In this step we are going to see our first VBA program. To read and display our program we need an object. In VBA that object or medium in a Msg Box.
- First, write “Sub” and then your “program name” (Guru99)
- Write anything you want to display in the Msg Box (guru99-learning is fun)
- End the program by End Sub

Step 4) Click on the green run button on top of the editor
In next step you have to run this code by clicking on the green run button on top of the editor menu.

Step 5) Select the sheet and click on “Run” button
When you run the code, another window will pops out. Here you have to select the sheet where you want to display the program and click on “Run” button

Step 6) Display the msg in Msg Box
When you click on Run button, the program will get executed. It will display the msg in Msg Box.

Summary
VBA Full Form: Visual Basic for Application. It’s a subcomponent of visual basic programming language that you can use to create applications in excel. With VBA, you can still take advantage of the powerful features of excel and use them in VBA.


Leave a Comment